SearXNG Docker 部署笔记
参考链接
- SearXNG官方文档
- SearXNG Github
- SearXNG-Docker Github
- SearXNG 开发者文档
- Docker安装教程(菜鸟教程)
- Docker-Compose安装教程(菜鸟教程)
获取基础配置与 docker-compose
执行 git clone https://github.com/searxng/searxng-docker.git 获取searxng基础配置文件和docker-compose.yaml。
可以根据需求修改docker-compose.yaml。我使用的1panel面板安装了OpenResty就去掉了caddy。需要限制ip就保留了valkey。
services:
  valkey:
    container_name: valkey
    image: docker.io/valkey/valkey:8-alpine
    command: valkey-server --save 30 1 --loglevel warning
    restart: unless-stopped
    networks:
      - searxng
    volumes:
      - valkey-data:/data
    logging:
      driver: "json-file"
      options:
        max-size: "1m"
        max-file: "1"

  searxng:
    container_name: searxng
    image: docker.io/searxng/searxng:latest
    restart: unless-stopped
    networks:
      - searxng
    ports:
      - "127.0.0.1:18081:8080"
    volumes:
      - ./searxng:/etc/searxng:rw
      - searxng-data:/var/cache/searxng:rw
    environment:
      - SEARXNG_BASE_URL=https://searxng.aikrai.xyz/
    logging:
      driver: "json-file"
      options:
        max-size: "1m"
        max-file: "1"

networks:
  searxng:

volumes:
  valkey-data:
  searxng-data:
settings.yml 基础配置
settings.yml 可配置的较多,可以看 settings.yml 和 设置文档,配合ai快速了解,进行修改。
use_default_settings: true

search:
  formats:
    - html
    - json

server:
  secret_key: "csGY6GTLbPh1PY"
  limiter: true
  image_proxy: true
valkey:
  url: valkey://valkey:6379/0
访问控制与限流:limiter.toml
修改 limiter.toml。我的需求是仅允许加白ip访问,所以进行了如下配置。
根据文档 Bot Detection 可知,SearXNG 的取 IP 规则是:当请求来自一个“受信任代理”(trusted_proxies)时,会从 X-Forwarded-For 列表里自右向左回溯,跳过受信任代理的 IP,取第一个不在受信任代理列表中的 IP作为“客户端 IP”。
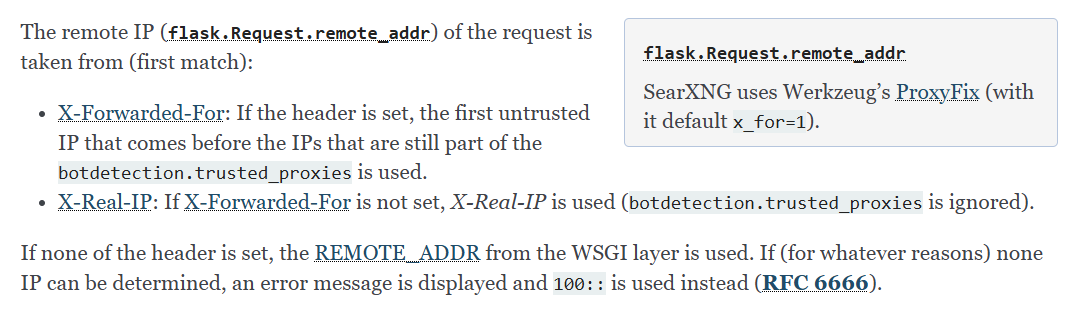
如果没有把 Cloudflare 的网段加入受信任, SearXNG 在 X-Forwarded-For: 真实访问ip, 162.158.167.132 中会停在右边的 162.158.167.132(Cloudflare边缘节点的 IP)
获取真实客户端 IP 的两种方式
方法 1:在 trusted_proxies 中加入 Cloudflare 网段
我域名托管在Cloudflare 上,使用了Cloudflare 的cdn,为了获取真实访问ip,要进行如下配置。
在trusted_proxies中将 Cloudflare IP地址范围 配置为受信任,就会取到真正客户端 IP。
[botdetection]
ipv4_prefix = 32
ipv6_prefix = 48

trusted_proxies = [
  '127.0.0.0/8',
  '::1',
  '192.168.0.0/16',
  '172.16.0.0/12',
  '10.0.0.0/8',
  'fd00::/8',
  '173.245.48.0/20',
  '103.21.244.0/22',
  '103.22.200.0/22',
  '103.31.4.0/22',
  '141.101.64.0/18',
  '108.162.192.0/18',
  '190.93.240.0/20',
  '188.114.96.0/20',
  '197.234.240.0/22',
  '198.41.128.0/17',
  '162.158.0.0/15',
  '104.16.0.0/13',
  '104.24.0.0/14',
  '172.64.0.0/13',
  '131.0.72.0/22',
]

[botdetection.ip_limit]
filter_link_local = true
link_token = true

[botdetection.ip_lists]
block_ip = [
  '0.0.0.0/0',
  '::/0'
]

pass_ip = [
  '允许的ip/32',
  '127.0.0.0/8',
  '::1',
  '192.168.0.0/16',
  '172.16.0.0/12',
  '10.0.0.0/8',
  'fd00::/8',
]

pass_searxng_org = false
方法 2:在 OpenResty/nginx 使用 realip 模块
在OpenResty或nginx中 用 realip 模块把 $remote_addr 改成真实客户端,在 http {} 或 server {} 里加入。当请求来以下可信网段时,Nginx 会把 header 里的“真实访客 IP”写进 $remote_addr。
http {
    set_real_ip_from 173.245.48.0/20;
    set_real_ip_from 103.21.244.0/22;
    set_real_ip_from 103.22.200.0/22;
    set_real_ip_from 103.31.4.0/22;
    set_real_ip_from 141.101.64.0/18;
    set_real_ip_from 108.162.192.0/18;
    set_real_ip_from 190.93.240.0/20;
    set_real_ip_from 188.114.96.0/20;
    set_real_ip_from 197.234.240.0/22;
    set_real_ip_from 198.41.128.0/17;
    set_real_ip_from 162.158.0.0/15;
    set_real_ip_from 104.16.0.0/13;
    set_real_ip_from 104.24.0.0/14;
    set_real_ip_from 172.64.0.0/13;
    set_real_ip_from 131.0.72.0/22;
    set_real_ip_from 2400:cb00::/32;
    set_real_ip_from 2606:4700::/32;
    set_real_ip_from 2803:f800::/32;
    set_real_ip_from 2405:b500::/32;
    set_real_ip_from 2405:8100::/32;
    set_real_ip_from 2a06:98c0::/29;
    set_real_ip_from 2c0f:f248::/32;
    real_ip_header CF-Connecting-IP;
    real_ip_recursive on;
}
启动与反向代理
- 执行
docker-compose up -d - 在1panel面板OpenResty中配置反代,配置https后,即可访问。
使用
网页使用直接访问域名搜索。
API 使用贴一个 spring boot 项目中的方法,参数详情查看 API 文档 。
    /**
     * 使用GET方法执行搜索
     *
     * @param params 搜索参数
     * @return 搜索结果
     */
    public SearXNGSearchResult searchWithGet(SearXNGSearchParams params) {
        UriComponentsBuilder builder = UriComponentsBuilder.fromHttpUrl(searxngHost + "/search")
                .queryParam("q", params.getQ())
                .queryParam("format", "json");

        // 添加可选参数
        if (params.getCategories() != null && !params.getCategories().isEmpty()) {
            builder.queryParam("categories", String.join(",", params.getCategories()));
        }
        if (params.getEngines() != null && !params.getEngines().isEmpty()) {
            builder.queryParam("engines", String.join(",", params.getEngines()));
        }
        if (params.getLanguage() != null) {
            builder.queryParam("language", params.getLanguage());
        }
        if (params.getPageno() != null) {
            builder.queryParam("pageno", params.getPageno());
        }
        if (params.getTime_range() != null) {
            builder.queryParam("time_range", params.getTime_range());
        }

        HttpHeaders headers = new HttpHeaders();
        headers.setAccept(Collections.singletonList(MediaType.APPLICATION_JSON));

        HttpEntity<?> entity = new HttpEntity<>(headers);

        ResponseEntity<SearXNGSearchResult> response = restTemplate.exchange(
                builder.toUriString(),
                HttpMethod.GET,
                entity,
                SearXNGSearchResult.class);

        return response.getBody();
    }
- 可以使用 API 编写一个联网搜索的 mcp 工具 。例如 duckduckgo-mcp-server ,brave-search-mcp-server,tavily-mcp 。
- 接入 deepseek 模型,对话时主动调用,赋予联网搜索的能力。